The last few days have been pretty busy. (An excuse you’ll find elsewhere on this blog.)

What led to this busyness was that I had guests booked in Mustardseed (one of the 18-foot yurts in écovallée) on June 11th. Which was great. Except that, on June 10th, it was still full of the other 18-foot yurt (which is called Peaseblossom), plus all the deconstructed beds of both yurts and the new outdoor kitchen roof, recently made by The Former Her Outdoors.

Regular readers will not be surprised that there was also rain on the forecast.

Here’s why I felt the kitchen roof needed replacing (my mate Philippe’s the real star in this shot – thank <Deity Name> he was here to help – I couldn’t have done all this without him):

old kitchen roof

Here’s me sorting out the bracing on Peaseblossom’s roof wheel, which fell to pieces while it was being put away at the end of last season:

yurt roof wheel

The forecasted rain came early, so we put the frame up fast:

yurt frame

Then the cover:

yurt roof

Before we turned our attention back to the kitchen:

new kitchen roof

It doesn’t take long to put the cover on, but look how it transforms the space:

new roof

After that, I remembered to take a shot of the finished yurt, just for you:

completed yurt

Next, the floor needed scrubbing, mopping and leaving to dry, so the deconstructed beds could be moved in. Then the beds in Mustardseed had to be reconstructed and made. The pots, plates and everything else were washed up and put in place in the kitchen, the solar shower and compost toilet cleaned, plus countless other jobs.

The guests had only booked one night. (They did this through booking.com, which prompted me to look harder at the settings and change the minimum number of nights to three – there’s more to this business than construction, cleaning and looking nonchalant when people arrive.)

Today was relatively easy: Said goodbye to one set of guests, then did a quick changeover for Puck (the 12-foot yurt), after buying all the stuff for the Welcome Picnic – ‘cos they’re staying for the week.

So that’s almost it. Apart from a few more hours of setting up Peaseblossom, écovallée is ready for its last ever season as a campsite.

More on this soon.

As promised, here’s the first almost-live blog on getting the yurt camp ready for opening on Thursday.

This year, Philippe came along and helped me put up Mustardseed – one of the two 18-foot yurts in the camp. It all went smoothly. Which was a good thing, as there was some kind of fierce storm due at 5 pm.

If you’re going to try this at home, you will need:

Yurt 1

A platform set into the corner of a few acres of mixed woodland. In this case, there’s quite a bit of false acacia (perfect for yurt platform uprights, fence posts, firewood – and lasts in water for 100 years), hornbeam (a personal favourite), hawthorn (which provides the welcome first bit of green in spring), oak (mainly spindly – I need to do some thinning out – but half a dozen beauties), sweet chestnut (which produces a very labour-intensive breakfast toast topping, and isn’t great for firewood; but it got us through a few winters), wild service trees and a whole bunch of other green stuff.

You will also need to carry the frame of your 18-foot, coppiced-chestnut, Kyrgyz-style yurt, by hand, from way over there.

yurt 2

Clean off the edging strips that go round the platform. These ones are 1 cm plywood – it doesn’t need to be marine ply, although that would probably last longer.

yurt 3

That unfeasibly heavy oak door spent the winter leaning against the sink in the outdoor kitchen a few metres away. It must have been carried for miles in the last 10 years. That’s the shower in the background.

yurt 4

Screw in the platform edges, with an unnecessarily intense look of effort. It’s not actually that hard with a machine. (A few years ago, I put some up with a socket set – don’t ask.)

yurt 5

Stand the walls up and try to remember how they fit together. Wonder why you didn’t take a moment to mark them in some helpful way at the end of last year. Or the year before that – even more sensible.

yurt 6

Pause, while Philippe takes a caught-on-CCTreeV shot.

yurt 7

Unwind the tension band.

yurt 8

Raise the roof.

yurt 9

Here’s further proof that marking poles when it matters is worth considering. Although, it does mean the yurts are different every year.

yurt 10

Here’s what Mustardseed looks like for 2016.

yurt 11

If there’s a storm coming, you need to carry the cover over, heave it on and rope up the wall.

yurt 12

Like this.

(The storm didn’t come.)

Every now and then, I like to bring you a minute (or so) from écovallée. Here’s a video I shot yesterday, on my reasonably priced phone, from the hammock outside Mustardseed…

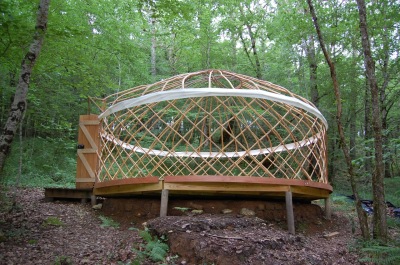
Here’s this year’s Peaseblossom frame up on the platform, before the cover went back on.

For new readers, it’s an 18-foot Kyrgyz-style coppiced chestnut yurt. Sleeps four very comfortably. The floor is locally sourced pine. Very comfortable on the foot. It gets furnished with comfy beds, duvets and all that stuff you don’t want to carry with you on holiday.

yurt up

It sits in mixed woodland of sweet chestnut, hawthorne, wild service, oak and hornbeam, and overlooks a grassy valley onto more woodland that has, for some reason, a fair amount of pine.

Just down the hill (as you can see in the previous posts) is the solar shower and compost toilet. Out of shot, to the right, is a canvas-covered kitchen and eating area shared with an identical yurt. There’s one other yurt way away to the left, with its own kitchen. That one’s a 12-footer perfect for two, or two and a bit. There’s also another 12-foot yurt off to the right and down the hill, but that’s just for playing in. Hence the sand pit and play area behind.

First guests of the season arrive tomorrow. And the écovallée summer begins…

We didn’t get the yurt onto the platform tonight. This is how far I got with the platform by about 8.30pm.

yurt platform 2

Trimming the boards took longer than I thought, but that edge is 18 metres in a straight line and quite a bit of it’s down the grain. Still can’t work out how it ended up too large, but it’s finally the right size.

By this time tomorrow, everything should be in place – including a new Lovely Thing in the compost toilet I’ve told you nothing about. It’s all coming together.

Here’s the platform at 13h45 the way I wanted it to be at 11h00.

yurt platform 1

Still on schedule but a few things to do before the yurt can go on it. Like trim the whole circle,’cos it’s too big, sand and seal the front door, mop the floor (no small job, that), add the edge, and fetch the yurt from the tractor shed.

But first, some coffee.

The forecast took a turn for the better today, so I got to spend most of it cleaning and fixing the Peaseblossom floorboards onto the joists I set up the other day. Was it yesterday? I have no idea.

Here’s how I left it a little while ago, before covering it up for the showers due for the next 24 hours. Pretty confident there’ll be a yurt sitting on this by Thursday evening, with guests due on Monday. Those lighter coloured boards are new this morning, from a place over near Castelnaud, to replace the ones I robbed out to finish the other platform a few days ago. Or whenever it was. It’s like a living Time Team around here. Only with metal hammers and cordless screwdrivers.

yurt platform

For anyone who wants a superbly accurate forecast that seems to be right most of the time, especially for the coming three days, check out accuweather. I’ve lived by this for years.

The last of the noggings went in a few minutes ago.

yurt platform joists

The first of the floorboards will go on after this short break…

UPDATE: Do not do it like this. See that square with the triangular bits on? On the left, you’ll see two joists that span the full distance, then smaller joists at right angles to it. I was cheating a bit here, using joists I already had. When you do it (as I did on another 18-foot floor), use joists that go the full span like those two on the left. What happened with this was that the noggings pulled out of the full-span joist near the centre and the floor dropped. OK, this was also because I was using nails that weren’t long enough. Next time, I’ll go for one nail and one screw to keep it in place.

Spent most of yesterday putting the joist frame for Peaseblossom together. Spot the silly mistake:

yurt joists

As with all of these constructions, there’s something that works really well and is deeply satisfying. Here’s an example of a four-way joint resting on an acacia post.

yurt joint

Those long, angled cuts take a while by hand. But are much easier since I started using a vise.

Todays it’s noggings and as much flooring as possible before some light rain forecast tomorrow. It’s going to be a bit of a week.

Over the last couple of days, my attention has switched from the Peaseblossom platform to the Mustardseed platform.

We have guests staying in this yurt at the end of next week and the floor had moved around a bit during its winter under plastic. (BTW, the mice ate through the plastic and the deer ripped the plastic with their hooves, so this is not the ideal way of keeping it in good condition. I’m still not sure what the ideal way is.)

The best solution as I saw it was to lift the floor and re-lay it. (Which is what I was doing this time last year.) The day before yesterday, I got it to this point:

yurt platform 1

Then yesterday, after much noise (I’m nailing the boards down again this time), it got to this point…

yurt platform 2

And then we put the yurt frame and roof up, and added the wall this morning. You’ll have to take my word for this, as I didn’t stop to take a photo.

In our mid-to-late 40s, this kind of physical activity is not as easy as it was, and Things Are Going To Change. Watch this space for some HUGE news in the next couple of weeks. In the meantime, I’ll post some video and keep you up to date with work as we put everything else back together for what promises to be our best summer ever!